Still in pursuit of large, clear cells.


I’m still in pursuit of those delicious sharp large cells from a dirty pour…..Of course all this trying uses lots of paint so here I’ve combined it with another issue, trying to use housepaint white as its so much cheaper than the art white paint!
I’ve got Much closer to the results I’m after but still having issues with the house paint cracking. Its not deep cracking, but along the edges where paint dried first, so maybe it was just too quick drying there? I’ve asked for help via facebook groups and one of the suggestions was to slow down drying by placing a box over the artwork. I’ll try that, along with other suggestions of increasing floetrol ration etc. I’ve a list of things to try, that’s probably going to be next video. I’m using Matt paint here, so I’ll try silk or satin ( or both if I have them), plus i was pouring over an old painting, and maybe with house paint it needs to be virgin substrate not over old works. I’ve done it successfully with ordinary paint loads of times but maybe the house paint reacts differently?
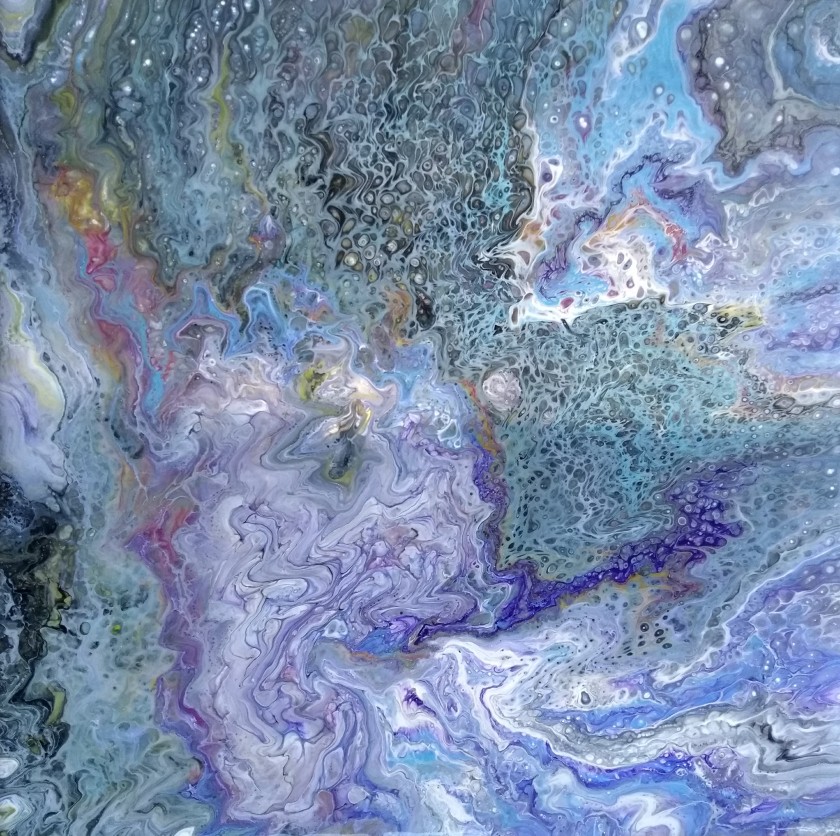
Below you can see the final painting dry and close up of the cracks. The cells though were much closer to what I’m aiming at so cracks not withstanding I’m happy 😉

the wet image
Image once dry, crack in the white at edges

Trying to pour with a sink strainer.

I’ve not yet found the right sort of strainer, I tried the one from my sink first, a stainless steel one with slots and a bit that sticks out of base. wasn’t a great success, colours didn’t stay separate, and it looks a little murky to me. . 
Then i bought one light a tea strainer with holes not slots. This time I poured colours individually. first pic I liked but the colours seemed slow to run out the holes ( they are small) so for the second i thinned paints a bit more. Thicker was best though 😉
I’ve another strainer on the way so more experiments to come 😉 Thicker and colours poured individually seems best for me. these are wet pics, so will change slightly in colour and tone as they dry. And hopefully haven’t run to one side. I do use level on canvas before starting but its easy to be a tiny bit out, or knock table esp as I use a wheelchair…

thicker paints
Thinner paints

I’ve a few more that have become backgrounds for new paintings. I’ll show them next time 😉 As usual some work, others not so well….

Working on “bad” pours to turn them into something new

Well those last three dried Awful, really didn’t like them so they’ve been added to the repour pile. That last one I salvaged while wet with the river effect became a map

This one I loved the cell section, but hated the rest so it became birds in flight. I’ve added extra detail with pens since taking this pic. 

I’ve done more to this too since photo, added tiny holgraphic stars and a bit more detail.
I’ve been working on a few more – some of them months old, ones that i couldn’t decide what to do with so put aside. Looking at them with a fresh eye often brings inspiration. It doesn’t end with a “bad” pour, if you like parts there’s so much you can do to add to it.

3 dirty pours, leaving paints to settle for an hour first

I’ve been struggling with cells in dirty pours. I see others who have terrific, big, clear cells, and mine are tiny or non existent and fall apart soon as I tilt. Doing a larger painting recently i’d mixed paints the day before and then layered them into cups and left for a couple of hours and its quite tiring for me and i needed to rest. Life in a wheelchair means adapting 😉 when i tipped my cup out I had some great cells and that made me wonder of mixing and layering paints then giving them time to work in cup might help so here I’ve done three paintings where i try just that.
the day after I was chatting online to another artist who had some fabulous cells and she reminded me that for cells you need much more paint than you think, and i’ve been relying on paint charts showing paint for coverage, but that means lots of tilting which is what can upset the cells. You can see that here in a way, i have some great cells out of the cup but once I start to move I lose some.
I tried next day using about 1.5 times more paint than usual and got much better results. Didn’t video that though – always the way isn’t it. I get the fails on camera and not the successes 😉 Still, its all learning and hopefully others can learn from my mistakes. ” I make mistakes so you don’t have to” d’you think that should be my slogan?
Anyway, dry pics are on my art blog, jeanniesartadventures I’m not entirely happy with them and may well repour two of them, the third, the one with the sparkle base, I’m going to varnish and see how that brings out the colours, then decide. I’ve re-poured over varnished works too, a coat or two of gesso and they’re fine.

I’m unsure about this one, might keep, might repour.
a definite repour, hate this one

I was playing with leftover paint, did a dirty pour, swiped it, added colour and swiped again, dragged stick through to create texture, and finally as I still didn’t like it I mixed some white and blue and poured over. Now it looks kind of river like, and I’m thinking maybe some pyramids and other Egyptian type additions so it looks like an old map. Maybe 😉


resin coated woodcuts

I’ve been playing with pouring on some mdf woodcuts, and then adding a coat of resin – I love the look of that stuff, just not the price 😦 I find the resin really enhances the metallic paints and glitters I love to add in to my work. Some of these, the fish, dragon, dinosaur and maybe the seahorse ( I can’t remember, think I used it on those) have tiny shards of glass in to give the effect of scales. I do a pour then add details with paint when dry. The fish, foxes and surfer are about 8 – 10 inches across/high and the chicken and sea horse are 16-17 inches high. I’ll add hooks on the back so they can hang alone or maybe add then to a board or canvas, either plain white or black, or a poured one in complementary colours. I’m having great fun with these. I’ve got others, Scottie dogs, some cats, swans, and large and small fairies and horses.

A pour through the top of a fruit shoot cup, and a few of my latest paintings

Out to breakfast with some friends recently I noticed that toddler Livvy had a fruit shoot drink and…it had an interesting top, so I took it when she finished. Its got little holes in for those of you who don’t have toddler relatives or friends with kids….
I wonder how many of us look at everyday items and rubbish with a view as to how we can use them for art! My shed is full of potentially useful items AKA known to non artists as junk.
I thought I’d pour through the top and see what happened. I made colours runnier than usual as the holes are tiny, and poured colours separately. I tried to rest the top on the canvas on a piece of sponge, as i wanted it a little above canvas, but that didn’t work so I just held it in place.
I like the effect but next time will try thicker paints, and maybe keep the shape a little better. I’m pleased with the painting though, its on a 6x6in canvas. I added black to corners rather than tilt to cover and lose shape. I might try that with bigger ones when i do a dirty pour – I always lose any cells when i tilt to cover corners…another new thing for me to play with! I’ve so many ideas I just don’t have the time or the money – especially the money 😉 to try them all. I have an ongoing list of ideas and it seems as i cross one off I add two more. I could never get bored with this way of painting.
I’ve also been playing with other ideas, and pouring on wood cut outs to try to imitate ceramics.

the dry image, varnish will being back the brightness
a swipe with black
a ring style pour then lines created with stick. then some glass shreds added over the black, just cos I like it! I think there’s a bit of silver glitter over it too.
a ring pour that was meh….so i added more lines when dry and some sparkles…still not really sure about it TBH. I’m going to resin it to seal in the sparkles but I might add some dark brown first
wet painted woodcuts, I’ve added some sparkels and some shredded glass on dinosaur and fishes. I’ve also added a little detail now they’re dry like lines on fins and some dark on tail of fox and some face details
Don’t think I’ve shown this one before, sorry of I have. It was a so-so purple pour so I painted black round some circles, added details and glitter.


pouring over old painting, with a limited palette

I wanted to do a ring style pour in limited colours., black, white and two blues. As usual it didn’t come out quite as I wanted, but I’m always happy to go with the flow, so to speak and I’m reasonably happy with the final result. I might add something once its dry, might just let it sit for a bit til I decide if its done. I used to find it hard to stop when paint was wet, now i find it hard not to keep adding stuff when its dry…. #whenisaworkdone

painting now dry, hasn’t changed too much 😉

Pour over backing board, second attempt, using alcohol for extra cells


I’ve several big perspex fronted silver metal frames so i thought i could use the backing board for a substrate and then place in frame. First attempt went wrong, very wrong. Looked fine when wet but the paint absorbed quickly into the wood surface and the final effect was very very dull and dark. Varnish will bring back shine but if a work is dark it’ll stay dark. I should have given board a coat of gesso first, that would have stopped paint being absorbed,m and the white would have reflected back colour. But I was lazy and wasted paint was the price!
Second attempt I’m much happier, the first failed work stopped the paint from being absorbed and I used white this time and lighter colours. size is around 24 by 16 inches

this was when still wet, when dry the colours were awful…but i can’t seem to find a picture of it….
second attempt, and I’m much happier with it. this is the dry painting, gloss will come back with a coat of varnish.

When I flicked the alcohol over to create cells i also got a few of these little dendrites. ( in the white circles). It seems the alcohol pushes the paint outwards and sometimes it forms these fern like structures.  I’ve done it with ink on white paint, dropping alcohol into the centre of the ink and its amazing seeing the shapes form.  Love that effect.
Alcohol is great for creating cells but they are much more fragile i find than ones created via silicon and they break up easily.

I had some paint left so did a quick flip cup and i love this.


a 30 x 30 inch canvas, largest pour yet


This is my largest painting so far at 30 x 30 inches. I made sure the wooden bits for tightening canvas were secure but paint still slide over to the middle 😦  Next time I’ll use stiff card underneath to support, and maybe less paint.
I love doing big works but aside from expensive to do by way of canvas and paint/medium needed costing ££’s, its also space consuming. They take longer to dry and use up so much space that I can’t do more painting for several days until they’re dry enough to move out of the way to finish curing.

I picked colours at random, mixed as usual and layered into jug, then poured a la ring pour style. There was so much paint and the canvas was so heavy though that I tilted too much, trying to balance on one corner, and I lost my rings. Next time I’ll use less paint – sod’s law i usually have reverse issue – and get some help to tilt slowly.
It was fun though, I learned a lot from it. This has had one coat minwax varnish and is hanging in my bedroom. I’m not totally happy with it though, so may add something by way of brush painting a feature on it. I’m just not sure what yet. sometimes after living with a work for a while inspiration suddenly strikes, but for this one I’m still waiting!
I’ve given a couple of close ups showing some details below, the gold looks far better in reality than on pc screen. Its always difficult to show metallic paint onscreen I find.